The newer Windows 11 operating system, got a sleeker and intuitive design. But, its design makes it harder to access advanced system settings. Just like Windows 10, Windows 11 also tries to direct you into the new look and feel settings menu while masking the old control panel which still has important settings.
Though the settings app has been drastically improved in Windows 11, the app still misses some important Control Panel settings.
Even after launching the control panel, you might have issues accessing some specific settings.
For instance, to change the environment variables of your system, you need to go to Settings->System->About->Advanced System Settings or else go to the Control Panel->System->Advanced System Settings and then click on the Environment Variables button.
Luckily, Windows 11 too has the God Mode, an advanced configuration page where you can find all advanced tools, features, and tasks all in one place. This is absolutely better than the modern settings.
Having said that, let’s see how to unlock God Mode in Windows 11.
How to Enable God Mode in Windows 11
To unlock and enable the God Mode in Windows 10 or Windows 11, you need to make a new special shortcut folder as shown in the image below:
- Go to Desktop screen
- Right click on any empty space in the Desktop
- Click on the New option and then select folder from various other options
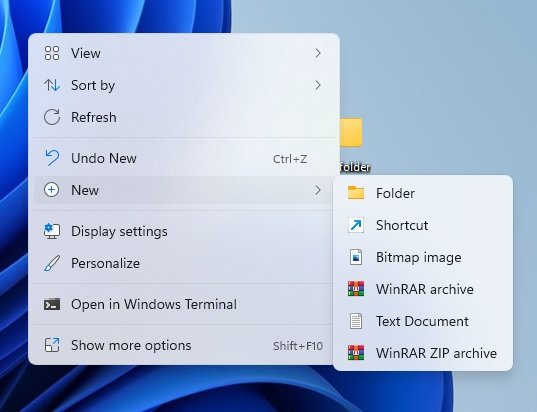
- A new folder will be created, right click or Press F2 to rename it
- Rename that folder to below name:
- GodMode.{ED7BA470-8E54-465E-825C-99712043E01C}
- Now, press enter to unlock the God Mode

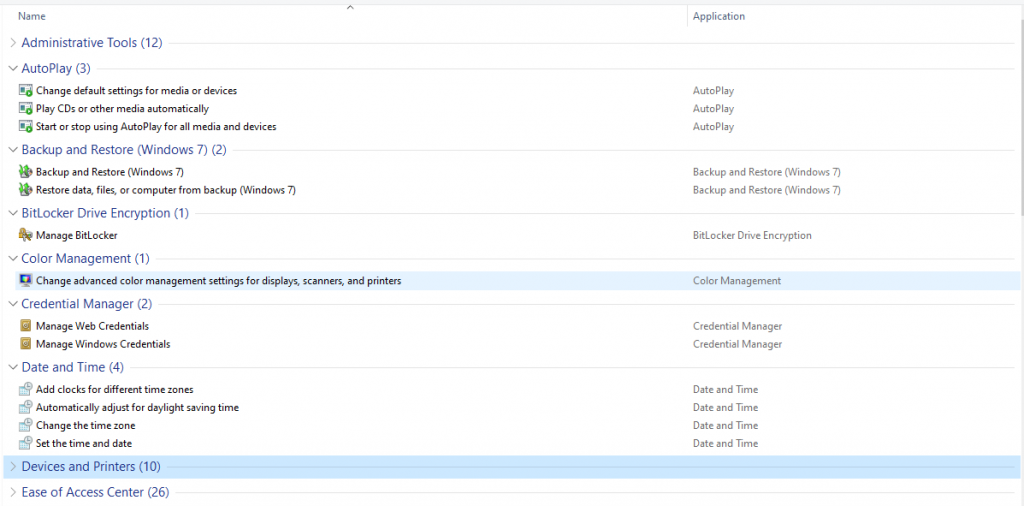
Once you complete the whole process, you will be taken to the page as shown in the image below.
To enhance your experience, you can even use the CLSID that allows you to directly access the individual settings page straight from the desktop.
For instance, you can create a folder to access Administrative Tools with the below name:
“{D20EA4E1-3957-11d2-A40B-0C5020524153}”
Tools like the defragmentation tool, disk format options, etc can be directly accessed from the Desktop.
Additionally, you can also try the below values:
- Network – {F02C1A0D-BE21-4350-88B0-7367FC96EF3C}
- Personalization – {ED834ED6-4B5A-4bfe-8F11-A626DCB6A921}
- Mouse properties – {6C8EEC18-8D75-41B2-A177-8831D59D2D50}
- Bluetooth – {28803F59-3A75-4058-995F-4EE5503B023C}
- Troubleshooting – {C58C4893-3BE0-4B45-ABB5-A63E4B8C8651}
Note: Remove the white spaces and replace ‘-‘ with ‘.’ to rename the folder to the settings page.
Looking for more Windows news? Signup for our newsletter and get the latest update.


